new studio.

I am ringing in 2014 with a brand new studio specializing in a brand new area. Boudoir photography is one of my most favorites. My mission in life is to make every person feel beautiful, cared about & loved. I get to accomplish these 3 things every single time I do a boudoir shoot. I get to photograph these gorgeous women in such an intimate setting. I get the honor of being trusted enough to do this & I often learn a lot of insecurities along the way. Every woman has something about her body that she doesn’t like, me included. Every woman has self-doubts, has too much of this here, too much of that there, has roots that need to be dyed, or a fingernail that is broken. The list goes on & on. It is my job as not only a photographer but a fellow woman to make you see what everyone else sees when they look at you. When I see you through my lens you are perfect. Every woman is beautiful in so many different ways. I have photographed young women, old women, skinny, normal, bigger, smaller, taller, shorter women, you name it, I’ve photographed it. & each and every one of you is beautiful. I am not saying all of this to get you through my door. I am simply trying to let everyone know why I do what I do, and why I am so passionate about boudoir photography. I get no greater satisfaction in life than seeing the look on my clients faces when I present them with their boudoir photos. I often get tears. I always get a “I cannot believe this is me!” It is you. Each and every one of you. I hope that one day I have the honor of letting you see what I see. What everyone else sees. You’re beautiful.

Please contact me at aquennoz@gmail.com, facebook.com/PoshStudioPacific, http://www.alisonQphotography.com or 314.691.0174. I would absolutelyDSC_7597 copy love to work with you. PoshDSC_7686

welcome back to me.

It’s been over a year since I’ve written anything. I wasn’t clear on my intention when I started writing this blog and it left me lost and unmotivated. Now, I’ve realized I just want to have an outlet. An online conversation with all of my clients, old DSC_0421& new, with my friends, my family. Just to have a documentation of everyday life. So, here goes. Let’s see what 2014 has in store for me!

aperture.&.shutter.speed.combined

happy friday! i hope this week has opened your eyes to the limitless possibilities you have in photography. and, we have only hit the tip of the iceberg.

today we are going to combine the first two elements (aperture and shutter speed) of the exposure triangle (shown here). as we have learned both aperture and shutter speed control the amount of light let in to your image sensor. these elements (along with ISO) control the light or darkness of your picture (exposure). we have also learned that if you adjust one element of the exposure triangle, you must adjust another in order to compensate for the change and get an evenly exposed picture.

let’s take a look below.

as you will notice each picture is of the exact same object in different lighting situations. they are all numbered in the upper right hand corner. let’s break them down to further understand scenarios when adjusting aperture and shutter speed are important.

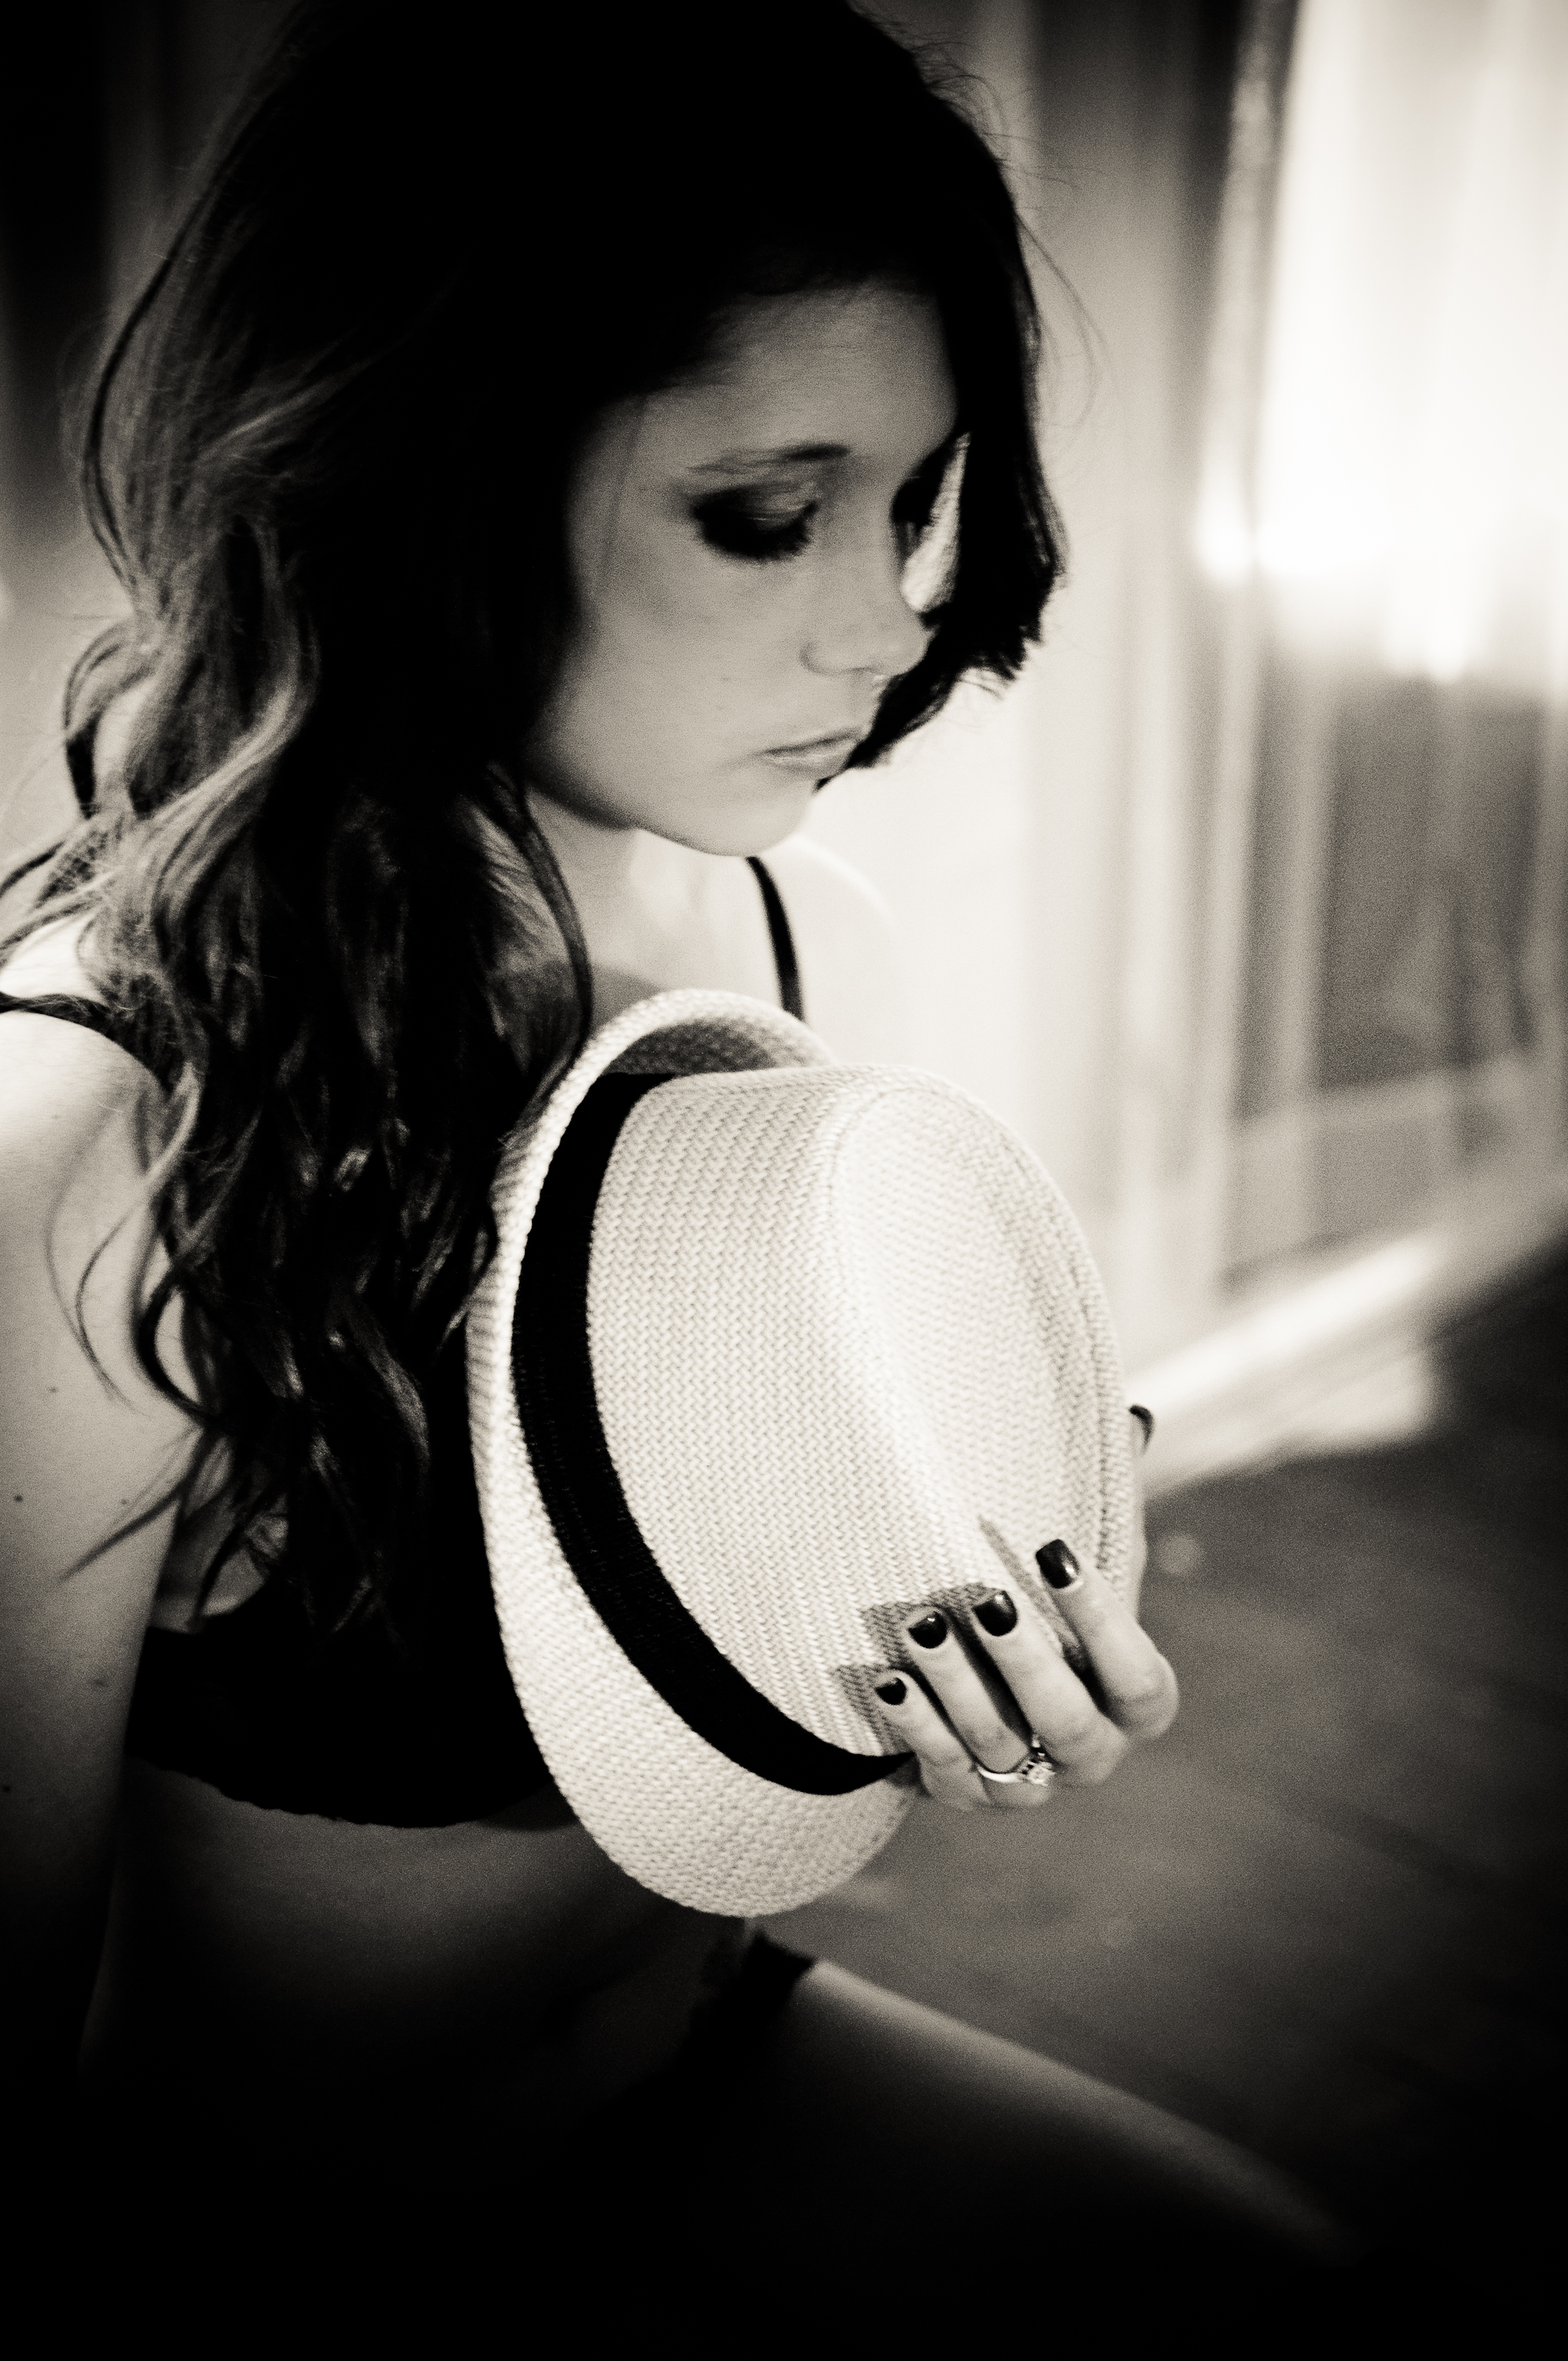
picture #1 – this picture was taken inside with only natural light. no flash was used. therefore, i needed to let in as much light as possible to correctly illuminate my image. therefore, i opened my lens the maximum aperture (f-stop 1.8) to allow the most light i could to reach my image sensor. this means i had to adjust my shutter speed to even out the exposure. the picture ended up evenly exposed at a shutter speed of 1/60.

picture #2 – this picture was taken outside in direct sunlight. i used to same aperture and shutter speed to demonstrate the need to adjust both when switching to different lighting.


picture # 3 – this picture is the exact same as the one above, only i adjusted my shutter speed. because the sunlight lets so much light into the image sensor, the aperture of 1.8 let’s in too much light. even with my camera’s maximum shutter speed of 1/4000 the image is still a little too light.

picture #4 – again, this picture is exactly the same as picture 2 and 3. this time i lowered my aperture (raised my f-stop) to 3.5 letting less light in. i also had to adjust my shutter speed to compensate. this image is evenly exposed at an f-stop of 3.5 and a shutter speed of 1/3700.

picture # 5 – this picture is also taken outside, but in the shade. i kept the same aperture (f-stop 3.5) as the previous picture (which was taken in direct sunlight) to demonstrate the use of shutter speed. with my aperture the same, i needed to dramatically slow my shutter speed in order to let more light in. therefore, this picture is evenly exposed with a shutter speed of 1/250 and an f-stop of 3.5.

picture #6 – this picture is taken in the same location as picture 5. with this picture i wanted to demonstrate that you could also raise your aperture (lower your f-stop) to achieve the same evenly exposed picture (this will be important as we learn more about shooting manually). here i lowered my f-stop to 1.8 which means i also need to raise my shutter speed to 1/1250. i need to raise my shutter speed because if i would have kept the slower shutter speed of 1/250 from picture 5 along with lowering my f-stop there would have been too much light reaching the sensor, therefore causing an over exposed image. thus, demonstrating again that if you change one element of the exposure triangle you must also change another to compensate for the new amount of light being let in.

congratulations! you now understand the important relationship between shutter speed and aperture. tomorrow we will go over ISO and sunday we will bring it all together, making you an exposure triangle aficionado.

as always, i encourage you to practice what you’ve learned. pick a set ISO and adjust your aperture and shutter speed. i find it helps to use the same prop in different locations (inside, outside, sun, shade) to fully understand how exposure works. always take notes on what your image looks like with higher and lower f-stops and faster and slower shutter speeds.

i would love to see your images from today. post below in the comments and let’s see what you come up with.

good luck! and happy shooting!

exposure.triangle.day.three

welcome to day three of our week of understanding the exposure triangle. today we are going to focus on aperture (or f-stops) in relation to evenly exposed pictures. let’s take a look at our friend the exposure triangle once again.

first things first, let start with the definition  aperture. aperture is a device that controls the amount of light admitted through an opening. in photography, aperture is the unit of measurement that defines the size of the opening in the lens that can be adjusted to control the amount of light reaching the digital sensor. the size of the aperture is measured in f-stops. let’s break that down.

if you take off your lens on your DLSR you will see a mirror, this is your image sensor (see photo).

the image sensor is the device in a digital camera that converts light into an electrical signal which is then converted into digital data to produce the image.

let’s take what we already learned from yesterday. when you click your shutter button to take a photograph your shutter opens and closes to capture the image you see through your viewfinder using your image sensor. the amount of time the cameras shutter is open is your shutter speed. therefore, the longer the shutter is open (higher shutter speed) the lighter your picture will be. that is if you hold all the other elements of the exposure triangle constant. remember, if you adjust one element, you must compensate by adjusting another.

now that you know how your camera takes the picture, let’s focus on aperture. as stated above, your aperture is nothing more than the size opening of your lens. this determines how much light is let in to reach the image sensor. aperture is measured in f-stops. the more light your lens lets through to the image senor the lower the f-stop, and the less light your lens lets in the higher the f-stop. to make things even more confusing, the higher the aperture the lower the f-stop. just think of aperture and f-stops as an inverse relationship. let’s look at the image below.

again, you will notice all three elements of the exposure triangle listed. the only element not held constant in the images above is the aperture. in the over exposed picture we have a high aperture (low f-stop). the opening of our lens is too large and letting too much light in to the image sensor causing an over exposed picture. in contrast, the under exposed picture has a low aperture (high f-stop). the opening of our lens is too small therefore not letting enough light in, causing an under exposed picture. the evenly exposed picture represents balance among the three elements of the exposure triangle. our f-stop is at 3.5 letting the appropriate amount of light in to the image sensor.

again, as you can see, if you change only one element of the exposure triangle you will cause your image to be either over or under exposed.

we are at the end of day three and well on our way to having an abundance of control over how you shoot. practice again today. pick a set shutter speed and ISO and adjust only your aperture. take notes on what your image looks like with higher and lower f-stops. tomorrow we will explore and combine what we have learned about shutter speed and aperture before exploring our last leg on the exposure triangle on Saturday.

i would love to see your images from today. post below in the comments and let’s see what you come up with.

good luck! and happy shooting!

exposure.triangle.day.two

welcome to day two of our week of understanding the exposure triangle. today we are going to focus on shutter speed in relation to evenly exposed pictures. let’s take a look at the exposure triangle again.

each element of the triangle is in direct relation with the others. this means if you adjust one element, you must adjust another to compensate for the change in light variance. again, this sounds complicated but it’s very simple.

let’s learn a bit about shutter speed. when you take a photograph, your shutter opens and closes to capture the image you see through your lens finder. the amount of time your shutter is open is your shutter speed. your shutter speed is measured in seconds (or in most cases fractions of seconds). the larger the denominator the faster the speed. when photographing something face paced like a rugby game, you want a fast shutter speed (a higher number) when you want to photograph something to capture its motion like a waterfall, you would use a slower shutter speed (a lower number). we will break down shutter speed and all of it’s possibilities next week, but today we are focusing only on shutter speed in relation to the exposure triangle.

let’s look at the image below from yesterdays post.

each picture has the three elements of the exposure triangle listed below. the image’s ISO, aperture (or f-stop) and shutter speed. you will notice that each picture has the exact same f-stop and ISO, therefore the only change for each picture is the shutter speed. the over exposed picture has a shutter speed of 1/500. this means the shutter was open for 1/500 of a second and let in too much light causing the image to be very bright (over exposed). in contrast, the under exposed image has a shutter speed of 1/6. therefore the shutter was only open for 1/6 of a second and didn’t allow enough light in to the camera causing the picture to be dark (under exposed). the evenly exposed image is perfectly lit with a shutter speed of 1/50. this means the camera’s shutter was open for 1/50 of a second letting the perfect amount of light in to illuminate the picture.

as you can see, if you change only one element of the exposure triangle you will cause your image to be either over or under exposed.

i want you to turn that dial to M and shoot manually today. pick a set f-stop and ISO and adjust only your shutter speed. take notes on what your image looks like with different shutter speeds. you may be surprised at the artistic ability you have after only this one short lesson. tomorrow we will explore f-stops.

i would love to see your images from today. post below in the comments and let’s see what you come up with.

good luck! and happy shooting!

new.year.new.beginnings.

happy 2012 to you and yours. i want to start out this new year getting back to basics. this week i am going to present myself (and you!) a photo challenge. i am going to focus on the “exposure triangle.” which i will summarize in today’s post, then focus step by step throughout this week.

the “exposure triangle” (as seen on right) explains the relationship between ISO, aperture (or f-stops) and your camera’s shutter speed in regard to the exposure of your picture.

let’s start at the very beginning. exposure is the total amount of light allowed to fall on the photographic image sensor during the process of taking a photograph. sounds complicated, but it’s really not! a photograph has three options, it can either be over exposed (too light), evenly exposed, or under exposed (too dark).

See my example below for visual. We will be using the image above throughout the week to explain each part of the “exposure triangle”. for today, play around with your camera and see what you come up with. remember, there is no correct way to shoot photography. it is art. some of my images are purposely over or under exposed, what i want is for you to be able to have greater control and understanding of exposure and all of it’s elements.

go ahead. turn that dial to manual and shoot. as the week unfolds you will be a exposure expert.

happy shooting!

photo.art.love

“art enables us to find ourselves and lose ourselves at the same time.” (Thomas Merton) & to me, everything in life is art. what you do. how you dress. the way you love someone. what you believe in & all of your dreams. the food you make. your handwriting. your grocery list. the way you feel. life is art.

there are few things in life that i love more than photography. it is an art form that tells stories with no words. captures a moment in time that would have otherwise been lost forever. in a still photograph you can feel pleasure, or pain. see strength, beauty, vulnerability. photography is simply ravishing.

in this blog i hope to open your mind to the limitless possibilities of photography as an art form. i will share tips, tricks, advice, opinions, interesting articles, & anything that sparks my mind. i hope to engage you with photo challenges, chat room discussions, & other exciting things to come.

i encourage you to examine your favorite photos. what do you love about them? what do you feel when you look at them? how do they draw you in? start to look at life through the lens.